Today I had to modify columns in a table of which I have them in VARCHAR2 and I want to move them to CLOB, for that reason I make this post because it may be that someone also needs it. If someone knows a better method please share it!
First of all let's look at these two data types. In Oracle, VARCHAR2 and CLOB data types are different in terms of their storage capacity and their way of manipulation.
VARCHAR2 is a data type used to store variable length character strings in the Oracle database. The maximum length of a VARCHAR2 value in Oracle is 4000 bytes. If we need to store a longer string, we can use the CLOB data type.
CLOB is a data type used to store large amounts of character data in the Oracle database. CLOB values can store up to 128 terabytes of data. CLOBs can also store Unicode characters and allow the use of multi-byte characters. CLOB manipulation is performed by special functions such as DBMS_LOB that provide an API for accessing CLOB data.
Let's see what are some of the additional differences between VARCHAR2 and CLOB:
Storage size: VARCHAR2 is limited to 4000 bytes of storage, while CLOB can store large amounts of data (up to 128 terabytes).
Data manipulation: VARCHAR2 values can be manipulated by standard string operations such as SUBSTR, INSTR and LENGTH, while CLOBs require special data manipulation functions such as DBMS_LOB.
Indexes: VARCHAR2 can be indexed with standard indexes, while CLOB indexes are handled differently and special full-text indexes are used.
Performance: VARCHAR2 is generally faster than CLOB, especially in operations involving string searches and comparisons. CLOBs require more storage and processing resources.
The CLOB data type is not compatible with the VARCHAR2, that is why we cannot directly change the data type, but also we cannot change the type of a table column if that column has data.
To do this, first of all we make a backup copy of the table we are going to work with :).
These are the steps I have taken to achieve this:
I have created a new column of type CLOB in the table
Then I copied the values from the VARCHAR2 column to the new CLOB column and verified that the data is correct.
Next, delete the original VARCHAR2 column.
And finally I have renamed the new column CLOB with the name of the original column VARCHAR2
Let's see an example of this operation:
-- Add a new column of type CLOB
ALTER TABLE my_table ADD my_clob CLOB;

-- Copy the values of the VARCHAR2 column to the new column
CLOB UPDATE my_table SET my_clob = my_varchar2;

-- Delete the original VARCHAR2 column
ALTER TABLE my_table DROP COLUMN my_varchar2;

-- Rename the new column CLOB with the name of the original VARCHAR2 column
ALTER TABLE my_table RENAME COLUMN my_clob TO my_varchar2;
It is important to note that this process can be slow and resource-intensive if the table is large. In addition, the table may need to be idle during the conversion process, which may affect system availability. Therefore, I recommend you to perform this process carefully and in a test environment before applying it in a production environment 🙂
I hope it will be useful!
Update
It turns out and happens that my desire to learn more and more every day has been heard! By publishing this post on Twitter my friend Javier Morales he told me that there is a much better way to perform this conversion and even hot without leaving latencies because I am in a moment removing the column and renaming, so I want you to see this video where he tells me a spectacular way to perform this conversion from varchar2 to clob that will leave you with your eyes open!
Quick SQL allows us to quickly design and prototype data models using an abbreviated markdown syntax that expands Oracle SQL. We can easily create master/detail relationships, check constraints and even generate sample data.
We can use this application for free to generate SQL and use it in any Oracle database.
To use this tool, we need to have a free Oracle.com account.
Click on the button Start Coding, the window to enter our Oracle credentials appears, and if we do not have credentials we can create a new one.
In this way we enter the Quick SQL tool (which, by the way, is developed in Oracle APEX 😊).
On the other hand, we can also use this tool if we are subscribed to a free workspace at apex.oracle.comor if we have a workspace, for example in an autonomous database in the Oracle cloud, we will have access to Quick SQL within APEX.
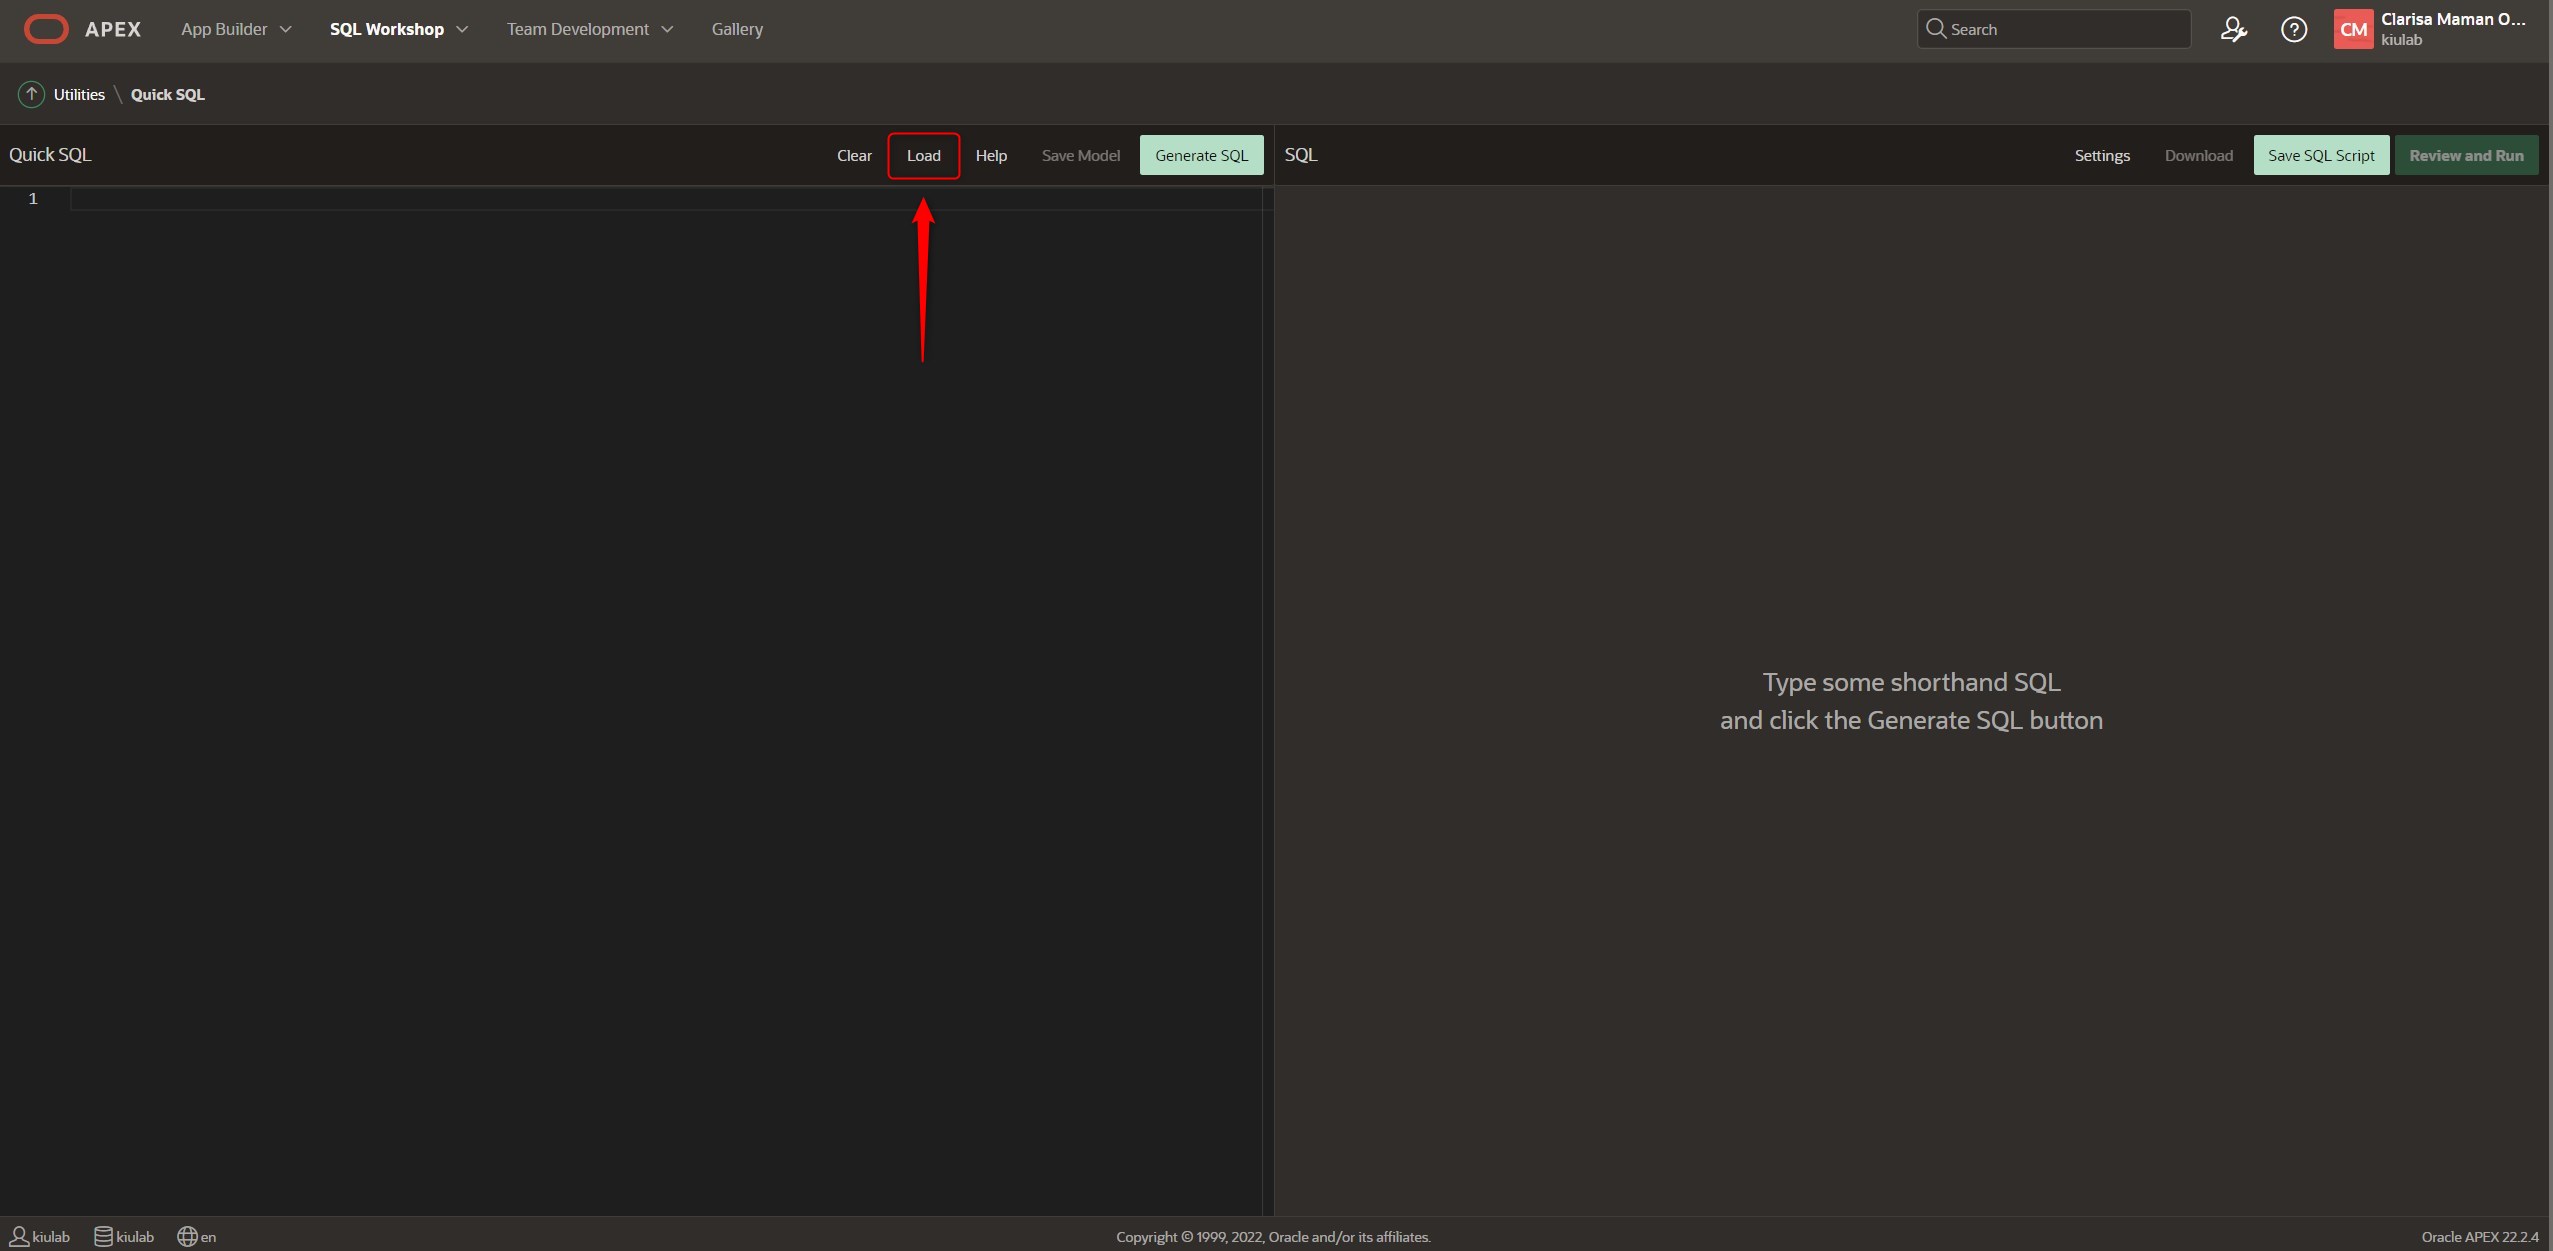
From the APEX home page we click on SQL Workshop –> Utilities –> Quick SQL.
To learn how to generate the codes, we can load a Quick SQL model, for example, we click on the button Load.
Select the data example: Departments and Employees.
We load the Sample, and we see how in the left quadrant we have the syntax to generate the SQL statements of what is displayed in the right quadrant.
We see the following code:
departments /insert 4
   name /nn
   location
   country
   employees /insert 14
      name /nn vc50
      email /lower
      cost center num
      date hired
      job
view emp_v departments employees
There are table directives as well as column directives. According to this example we see the following:
/insert 4 => this means "Generate 4 SQL INSERT statements with random data" (table directive)
/nn vc50 => this means "Add a non-null constraint to the preceding column, in this case name, further defines that it is a varchar2(50) data type" (column directive)
/lower => this means "forcing the column to be in lower case" (column directive)
num => this means "of which the column is a numeric data type".
Generate the following SQL Script:
-- create tables
create table departments (
    id                             number generated by default on null as identity
                                   constraint departments_id_pk primary key,
    name                           varchar2(255 char) not null,
    location                       varchar2(4000 char),
    country                        varchar2(4000 char)
)
;

create table employees (
    id                             number generated by default on null as identity
                                   constraint employees_id_pk primary key,
    department_id                  number
                                   constraint employees_department_id_fk
                                   references departments on delete cascade,
    name                           varchar2(50 char) not null,
    email                          varchar2(255 char),
    cost_center                    number,
    date_hired                     date,
    job                            varchar2(255 char)
)
;

-- table index
create index employees_i1 on employees (department_id);


-- triggers
create or replace trigger employees_biu
    before insert or update
    on employees
    for each row
begin
    :new.email := lower(:new.email);
end employees_biu;
/
-- create views
create or replace view emp_v as
select
    departments.id                                     department_id,
    departments.name                                   department_name,
    departments.location                               location,
    departments.country                                country,
    employees.id                                       employee_id,
    employees.name                                     employee_name,
    employees.email                                    email,
    employees.cost_center                              cost_center,
    employees.date_hired                               date_hired,
    employees.job                                      job
from
    departments,
    employees
where
    employees.department_id(+) = departments.id
/
-- load data
insert into departments (
    id,
    name,
    location,
    country
) values (
    1,
    'Internal Systems',
    'Tanquecitos',
    'United States'
);
.........
.........
.........
And it continues here by inserting rows in the Department and Employees tables; 4 records in the Departments table and 14 records in the Employees table.
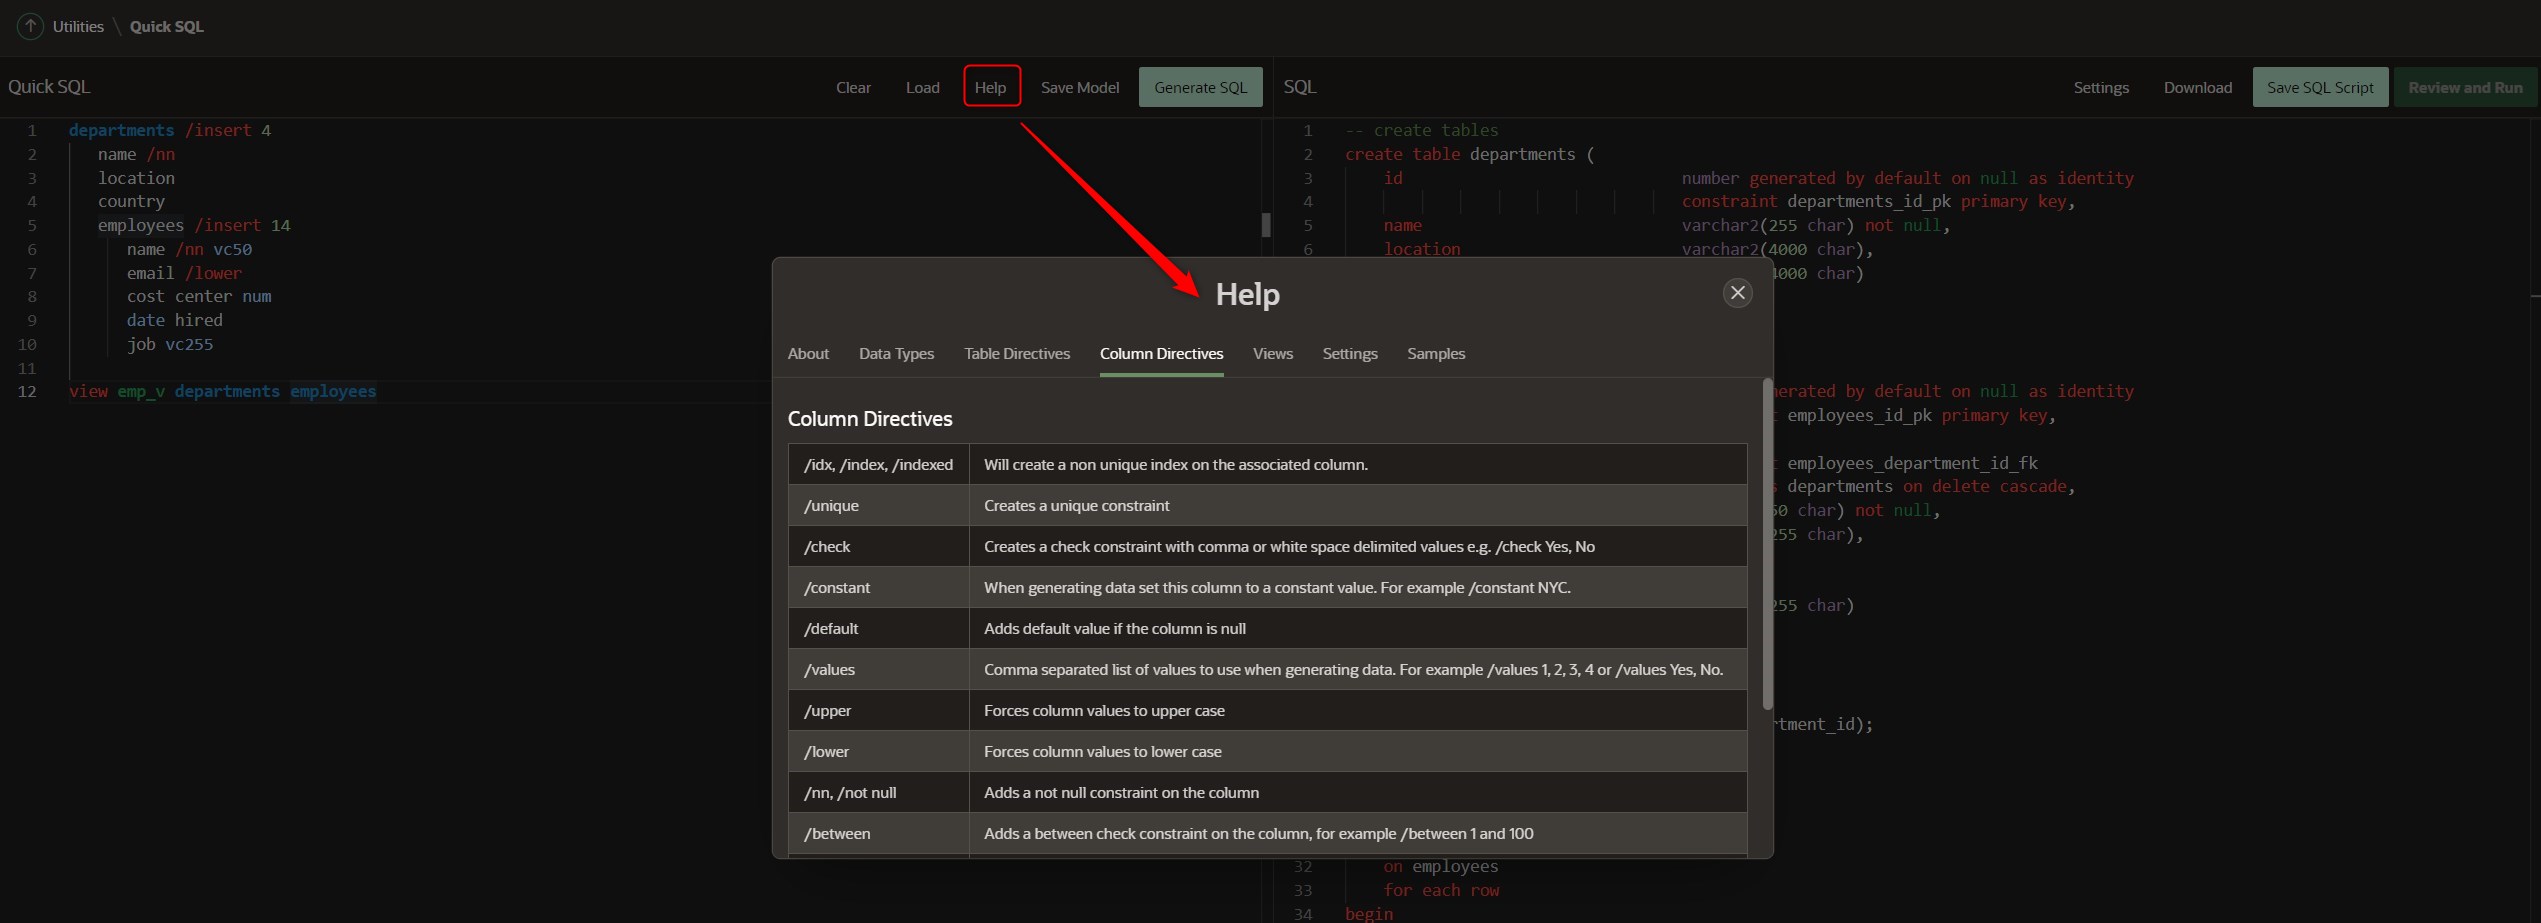
To learn more about the tool we have the help where it shows us the data types, table and column directives, views, configurations and examples.
We can save the script, download it and run it directly in our schematic.
Using this tool makes writing SQL code much easier, I invite you to use it and tell us what you think in the comments. 😊
In today's globalized world it is so important to be able to have our applications well translated.
In this post I want to show you how we can use the Oracle APEX Message function to translate text strings (or messages) generated from stored procedures, functions, triggers, packed procedures and PL/SQL functions.
Remember that Oracle APEX is translated into 10 languages including Spanish 😊
But when we call procedures within our application, the internal APEX messages are in English, and that's why we use this APEX feature called "Text Message" to translate those messages.
There are about 126 internal messages that need to be translated, as shown in the excerpt from the table below:
This table can be viewed in its entirety in the Oracle APEX documentation in the following link.
In addition, there are also messages that require translation that correspond to the Interactive Grid.
And of course, there are also messages to be translated that correspond to the Interactive Report.
On the other hand, if we use the new APEX Progressive Web App (PWA) functionality we also need to translate the messages.
When using smart filters and facet searches in our application, it is also necessary to translate the messages.
Here is an example of how to translate a message in APEX.
We open our application in Oracle APEX.
For this demonstration I have created a simple application in Oracle APEX.
It is important to note that Oracle Application Express is translated by default into 10 languages, as I mentioned above (English, German, Spanish, French, Italian, Japanese, Korean, Brazilian Portuguese, Simplified Chinese and Traditional Chinese). Unfortunately, if our application uses a different language, we must translate ourselves the internal messages displayed by the APEX reporting engine, such as the Actions button, the search or the "next/previous, etc." links.
But before we learn how to translate APEX internal messages, let's learn how APEX works with the "Text Messaging”.
First of all, we define the language of our application in the globalization section of the application definition.
Save the changes.
Next, we can create a greeting message for the user.
To do this, we go to Shared Components => Text Messages
Click on the button Create Text Message.
The modal window for creating the Text Message opens.
En primer lugar, ingresamos el nombre del mensaje de texto, por ejemplo, GREETING_MSG, seguidamente seleccionamos el idioma inglés y en el recuadro de texto colocamos: <h1>Good morning %0!</h1>.
Seguidamente, realizamos el mismo procedimiento para crear el texto en español, como sigue: <h1>Buen día %0!</h1>.
Click on the Create Text Message button.
What we have done is to create a message called GREETING_MSG in our application in Spanish as Buen Día %0 and in English as Good morning %0.
Let's see how we can now invoke this message:
BEGIN
--
-- Print the greeting
--
HTP.P(APEX_LANG.MESSAGE('GREETING_MSG', V('APP_USER')));
END;
The way in which the attribute is defined p_lang depends on how the APEX engine derives the main language of the application. For example, if we are running the application in Spanish and the above call is made to the APEX_LANG.MESSAGE API, the APEX engine first looks for a message called GREETING_MSG with a LANG_CODE of is. Si no encuentra nada, se revierte al atributo Application Primary Language. Si aún no encuentra nada, el motor APEX busca un mensaje con este nombre con un código de idioma de in.
Function syntax:
APEX_LANG.MESSAGE (
    p_name            IN VARCHAR2 DEFAULT NULL,
    p0                IN VARCHAR2 DEFAULT NULL,
    p1                IN VARCHAR2 DEFAULT NULL,
    p2                IN VARCHAR2 DEFAULT NULL,
    ...
    p9                IN VARCHAR2 DEFAULT NULL,
    p_lang            IN VARCHAR2 DEFAULT NULL,
    p_application_id  IN NUMBER   DEFAULT NULL )
RETURN VARCHAR2;
Parameter Meaning
Parameter
Description
p_name
Message name as defined in Text Messages under Shared Components of your application in Oracle APEX .
p0 a través de p9
Dynamic substitution value: p0 corresponds to %0 in the translation chain; p1 corresponds to %1 in the translation chain; p2 corresponds to %2 in the translation chain, and so on.
p_lang
Language code of the message to retrieve. If not specified, APEX uses the current language for the user as defined in the Application Language Derived From attribute.
p_application_id
Used to specify the ID of the application within the current workspace that owns the translated message you wish to return. Useful when encoding packages that may be called outside the scope of APEX, such as packages called from a database job.
Parameters description
Now that we know this function, let's see how to implement it in our application.
For example, on page 1 of our application we are going to greet the logged in user.
In the breadcrumb bar region we create a dynamic content region and enter the following code:
BEGIN
--
-- Print the greeting
--
HTP.P(APEX_LANG.MESSAGE('GREETING_MSG', V('APP_USER')));
END;
As our application is defined in the primary language as Spanish (United States) (es-us), when running the application, we will see the user greeting in Spanish:
Now if we change the primary language of the application to English, we will see that when the page is executed, the message will be displayed in English.
Now that we know how Text messages work in APEX, let's see how we can translate APEX internal messages.
For this second demonstration we are going to define our application with the language Ukrainian (uk). (I choose this language because I am proudly of Ukrainian descent, my mother was born in Poltawa, Ukraine, and I have a great affection for my mother's land, and a great love for my homeland Argentina where I was born and raised and now that I live and enjoy the United States I feel very globalized 😊).
When running our application, nothing will be in Ukrainian, right? 😊 then let's create the text message for the greeting in Ukrainian (I trust google translator 😊 ).
And when executing we see the greeting 😊
Now on the other hand, I have the interactive Employee report on page 2.
What I can translate in my application I do on my own, for example the name of the navigation path entry we translate it from Employees to Співробітники.
Undoubtedly everything that we can translate such as the headers of the report, or when more data is found or if there are no records in the report, all of that we can translate from the same page designer without problems.
But how can we translate for example the name of the Actions button or the Go button of the interactive report, because now the APEX engine cannot find a Ukrainian translation and it will show it in English.
So let's see an example of how to translate the name of the Actions button, and the name of the Go button in the search bar into the Ukrainian language.
Interactive Report Messages
We create two text messages:
Text Message
In English
In Ukrainian
APEXIR_GO
Go
Знайти
APEXIR_ACTIONS
Actions
Дії
Description of text messages
These text messages can be found in the table 21-3 from the Oracle APEX documentation regarding the internal message translation issue that I mentioned earlier in this article.
Now we run the application and we see that in the interactive employee report we can already see the translation of the Go button and the Actions button.
This way we can translate internal messages in APEX using this "Text Messaging" functionality.
I share with you this link where you can find the translation scripts for many languages made by the Pretius team.
AI came to help us and today all over the world people are talking about GPT Chat and here I also join this talk!
I want to show you in this post, how I have developed a small application in Oracle APEX that uses the GPT Chat API to get a meal plan and an exercise plan 😊.
We all at some point see ourselves with the need to go on a diet or improve our lifestyle by eating healthier and exercising, in my case I need it urgently! 😊 Today thanks to AI I want to show you how to call the OpenAI API from APEX to create this very simple demo.
First of all, I would like to thank a fellow Oracle APEX expert, Michellewho thanks to your post motivated me to get into this world of GTP and APEX 😊 thanks Michelle!
Now, let's see what Chat GPT is. The ChatGPT is a model that is capable of following a prompt and providing a detailed response.
The capabilities of this tool are that:
Remember what the user said earlier in the conversation.
Allows the user to provide follow-up corrections
Trained to reject inappropriate requests
As for limitations, the tool warns of the following:
Occasionally may generate incorrect information
Occasionally may produce harmful instructions or biased content
Limited knowledge of the world and events after 2021.
In order to use the chat we need to create an account at the following link: https://openai.com/
According to the documentation GPT-3 models can understand and generate natural language. They offer four main models with different power levels suitable for different tasks. Davinci is the most capable and Ada is the fastest.
LATEST MODEL
DESCRIPTION
MAXIMUM REQUEST
TRAINING DATA
texto-davinci-003
The most capable GPT-3 model. It can perform any task that the other models can perform, often with higher quality, longer duration and better instruction tracking. It also supports the insertion of in-text completions.
4,000 tokens
Until June 2021
texto-curie-001
Very capable, but faster and lower cost than Davinci.
2,048 tokens
Until October 2019
texto-babbage-001
Capable of performing simple, very fast and lower cost tasks.
2,048 tokens
Until October 2019
texto-ada-001
Capable of very simple tasks, generally the fastest model of the GPT-3 series and the lowest cost.
Davinci is the most capable family of models and can perform any task that the other models can perform and often with less instruction. For applications that require a lot of content understanding, such as summaries for a specific audience and creative content generation, Davinci will produce the best results. These greater capabilities require more computing resources, so Davinci costs more per API call and is not as fast as the other models.
Another area in which Davinci shines is in understanding the intent of the text. Davinci is quite good at solving many types of logic problems and explaining the motives of characters. Davinci has been able to solve some of the most challenging AI problems involving cause and effect.
Good at: complex intent, cause and effect, audience summary
Curie is extremely powerful, and very fast. While Davinci is stronger when it comes to parsing complicated text, Curie is quite capable for many nuanced tasks such as classification and sentiment summarization. Curie is also quite good at answering questions and performing Q&A and as a general service chatbot.
Good at: language translation, complex classification, text sentiment, summarization
Babbage can perform simple tasks such as simple classification. It is also quite capable when it comes to semantic search that classifies how well documents match search queries.
Good at: moderate classification, semantic search classification
Ada is usually the fastest model and can perform tasks such as parsing text, correcting addresses, and certain types of sorting tasks that do not require much nuance. Ada's performance can often be improved by providing more context.
According to the tool, it tells us to use the Davinci model as it is an excellent way to find out what the API is capable of.
To learn more about the API I leave here the link:
To be able to use the API in our Oracle APEX application it is necessary first of all to generate our API key. To do this in our profile we access to View API keysand there we can create a new API Key.
Example of promp:
Note: it is better to have a much shorter prompt, since it is easier to get what we really want to get and also we would not have error in the playground when we want to test our prompt. For this demonstration I have made it very simple to have a first approach to this tool. Let's see what the AI recommends us according to the prompt we enter.
"Act like a nutritionist and create a 3-day diet for me. Create a Detox Diet. The diet should have one serving of protein and two servings of fat and three servings of vegetables and one serving of carbohydrates, for each meal. Prioritize foods that are high in the micronutrients on this list: Iron, Magnesium. Also, I am allergic to or do not like: Salmon. I want you to describe recipes with step-by-step for each meal on a new line. Describe what micronutrients each meal contains."
Ingreso al chat GPT:
Y vemos que el chat nos responde con la dieta que pedimos.
Oracle APEX con GPTchat
Ahora creamos una página en APEX para poder seleccionar las opciones. Luego al seleccionar las opciones que deseamos, hacemos clic en el botón Obtener Mi Plan para realizar la llamada a la API de OpenAI.
Esta página contiene:
1 elemento de página de tipo Select List (Cantidad de Días).
1 elemento de página de tipo Radio Group (Tipos de Dietas).
4 elementos de página de tipo Checkbox (proteínas, Vegetales, Grasa, y Carbohidratos).
3 elementos de página de tipo Textarea (Alergias, Incluir Micronutrientes, Comentarios).
2 elementos de página de tipo Switch (Incluir Información Nutricional, Incluir Receta).
1 elemento de tipo Textarea para mostrar el resultado.
Un botón para llamar a la API de OpenAI y otro botón para limpiar la pantalla que simplemente limpia todos los elementos de la pantalla.
El proceso que utilizamos para darle la indicación a la API de nuestro prompt es el siguiente:
“Actúa como un nutricionista y crea una dieta para mí de 3 días. Elabora una Dieta Detox. La dieta debe tener una porción de proteína y dos porciones de grasa y tres porciones de vegetales y una porción de carbohidratos, para cada comida. Prioriza las comidas que tienen alto valor de los micronutrientes de esta lista: Hierro, Magnesio. Además, soy alérgico o no me gusta: Salmón. Quiero que describas recetas con el paso a paso por cada comida en una nueva línea. Describa qué micronutrientes contiene cada comida.”
Lo resaltado en negrita serían nuestras opciones. Y las demás opciones se activarán en caso que seleccionemos lo elementos para obtener los requerimientos.
El siguiente código PL/SQL lo agregamos como un proceso cuando se hace clic en el botón Obtener Mi Plan.
declare

l_prompt varchar2(4000);

begin

    l_prompt:='Actúa como un nutricionista y crea una dieta para mí de ' ||:P4_DIAS_SOLICITADOS||' días.';

    if :P4_TIPO is not null then
        l_prompt:=l_prompt||'Elabora una '||:P4_TIPO||'.';
    end if;

    if :P4_PROTEINAS = 'Y' then
        l_prompt:=l_prompt||'La dieta debe tener una porción de proteína y ';
    end if;

    if :P4_GRASAS = 'Y' then
        l_prompt:=l_prompt||'dos porciones de grasas y ';
    end if;

    if :P4_VEGETALES = 'Y' then
        l_prompt:=l_prompt||'tres porciones de vegetales y ';
    end if;

    if :P4_CARBOHIDRATOS  = 'Y' then
        l_prompt:=l_prompt||'una porción de carbohidratos para cada comida.';
    end if;

    if :P4_INCLUIR_MICRONUTRIENTES is not null then
        l_prompt:=l_prompt||' Prioriza las comidas que tienen alto valor de los micronutrientes de esta lista: '||:P4_INCLUIR_MICRONUTRIENTES||'.';
    end if;

    if :P4_EVITAR_COMIDA is not null then
        l_prompt:=l_prompt||'Además, soy alérgico o no me gusta estos alimentos: '||:P4_EVITAR_COMIDA||'.';
    end if;

    if :P4_INCLUIR_RECETA_DIRECCIONES = 'Y' then
        l_prompt:=l_prompt||'Quiero que describas recetas con el paso a paso por cada comida en una nueva línea.';
    else
        l_prompt:=l_prompt||'No incluya receta para cada comida.';
    end if;

    if :P4_INCLUIR_INFO_NUTRICIONAL = 'Y' then
        l_prompt:=l_prompt||'Describa qué micronutrientes contiene cada comida.';
    end if;

    if :P4_COMENTARIOS is not null then
        l_prompt:=l_prompt||'. '||:P4_COMENTARIOS||'.';
    end if;

    chatgpt_pkg.get_completion(
        in_parm1 => l_prompt,
        out_plan => :P4_RESPUESTA);

end;
El paquete que necesitamos para que se realice la llamada, fue creado por Michelle, gracias Michelle por este gran aporte! 😊 Visita su blog aquí.
Qué interesante lo que puede hacer la IA!, replico lo que ella preguntó para poder hacer la llamada con pl/sql, me encantó!
Cuál es el código PL/SQL requerido para usar apex_web_service.make_rest_request para hacer una llamada a GPT3 usando el modelo text-davinci-003.
Aquí está el paquete creado que podemos usar según las especificaciones dadas.
create or replace PACKAGE "CHATGPT_PKG" is
/*
Purpose: PL/SQL package for OpenAI API
Remarks: Allows us to post requests to OpenAI API
Who Date Description
—— ———- ————————————-
MS 14.1.2023 Created package
*/
procedure get_completion (
in_parm1 in varchar2,
out_plan out clob
);
end chatgpt_pkg;
create or replace PACKAGE BODY "CHATGPT_PKG" is
g_gpt_api_url constant varchar2(255) := 'https://api.openai.com/v1/completions';
g_api_secret constant varchar2(255) := 'API Key';


procedure get_completion (
in_parm1 in varchar2,
out_plan out clob
)
is
l_result clob;

/* the parameters in the request could/should be variables for a more flexible call */

l_request_text varchar2(4000) := '{"prompt": "'||in_parm1||'", "model": "text-davinci-003","temperature":0.7,"max_tokens":2000}';

l_json_table clob;

l_status_code number;

begin
apex_web_service.g_request_headers.delete(); -- clear the header
apex_web_service.g_request_headers(1).name := 'Content-Type';
apex_web_service.g_request_headers(1).value := 'application/json';
apex_web_service.g_request_headers(2).name := 'Authorization';
apex_web_service.g_request_headers(2).value := 'Bearer '||g_api_secret;
l_result := apex_web_service.make_rest_request(
p_url => g_gpt_api_url,
p_http_method => 'POST',
p_body=>l_request_text
);
--Get the status code from the response
l_status_code := apex_web_service.g_status_code;
--Raise an exception if the status code is not 200
IF l_status_code != 200 THEN
raise_application_error(-20000, 'La solicitud de API falló con el código de estado: ' || l_status_code);
END IF;
for i in (select * from json_table(l_result, '$.choices[*]'
columns (
value varchar2(4000) path '$.text'
)
))
loop
out_plan:=out_plan||i.value;
end loop;
end get_completion;

end chatgpt_pkg;
En la demo también he creado una página para obtener un plan de ejercicios 😊
¡Si tienes comentarios o aprendes algo nuevo sobre este nuevo mundo del chatGPT y Oracle APEX por favor escribe en los comentarios!
¡Hay mucho por aprender todavía, pero esto es un gran inicio y agradezco a todas las personas que siempre están ayudando y compartiendo lo que aprenden con la comunidad! ¡En este caso va mi agradecimiento especial a Michelle por este gran aporte!
March 8 is the International Women's Day and, as a society, we must think more and more about what it means to celebrate women on their international day.
At this particular time, I reflect on some of the reasons that can make it difficult for women to enter the world of technology and how we can help minimize those obstacles.
These reasons, from my perspective, are as follows:
Gender stereotypes: There is a widespread perception that technology is a predominantly male field, which can create an inhospitable environment for women who want to enter the sector. This perception can also create biases in the hiring and promotion of women in the industry, limiting their opportunities. In addition, gender stereotypes can also make women feel insecure about showing their interest in technology or expressing their opinion in the workplace.
Thanks to communications and education in general, this reason is becoming less and less important, but there is still a long way to go before this perception becomes a thing of the past.
I remember when I entered the university to study Information Systems Engineering, the classrooms were full of boys and if I was lucky I could find some women. Years went by and in some subjects the proportion between men and women was abysmal, no more than 10% of the course were women. I got used to it... I got used to being, as I thought at that time, "in a man's world" and that is why I decided to be part of the change.
I came from a family of 6 siblings and my mother was looking for the baby, which came, but twice! Yes... that's right, my twin sister Emi and I were born. Since I was a teenager I have always had a very strong sense of equality, when my brother came back from leave from military service, I remember my mother asking me to take his uniform and combat boots that were full of mud and mud. I don't need to describe the feeling that this provoked in me, and really that situation was always the trigger for big arguments with my mother because I never did it. I never understood that, because I was a woman, I had to do certain things that men were not asked to do.
I could understand my mother, being Ukrainian, raised in a very difficult time for humanity, she had no idea what society took away from us simply because we were born women. Today all that is changing and I am glad to be part of that change.
Later, as I developed as a person and learned to defend my position against the male sex, I had the great opportunity to join the Argentine Air Force (FAA) to work in IT. I had the great opportunity to be the first woman in the Air Group of the Military Aviation School of the FAA back in 2000 and experience the change where more women would be part of the agency not only as civilians but as military pilots, and that would cause in me a great shudder because I began to see changes in that very masculine world to become a more inclusive world! worthy of mention.
2004 - Military Aviation School of the Argentine Air Force - Córdoba, Argentina.
As a woman and an IT professional, I invite all women to be part of the change and banish gender stereotypes forever. Becoming an IT professional is not a matter of gender but of skills.
Lack of role models: Women may have difficulty finding role models in the technology industry, which can limit their ability to envision a career in this field. The lack of role models may also lead to less participation by women in networking initiatives and community building in the technology industry.
Such an important point is the role model, I certainly did not have a female role model to follow, and actually writing these lines I did not have a male role model to hold on to in terms of the professional side. I would have loved to find someone who could have been my mentor at that time.
What I do remember is the great help I had at that time, from the man who is now my husband, Julio. He always had and still has, the ability to abstract complex concepts and explain them so clearly that anyone can understand it, so he taught me the logic to program and I developed my first program in Pascal and I managed to understand that concept as abstract as programming is. He also taught me Algebra and Mathematical Analysis. I never forget that in college classes of these two subjects I did not understand anything, but when I got home, he took some of his time and explained to me how to decompose the theorems, integrals, derivatives and to lose all fear of numbers; then in my head everything made sense, so I applied the same thing in the future when I worked as a teacher at the Military Aviation School and I began to love teaching and trying to teach as I would have liked to be taught. I am still learning how to teach, there is still a long way to go, there are still lives to change and that is why today I am still teaching after 25 years where I was in front of a classroom for the first time in 1997.
Lack of supportLack of support at home, at school and in the workplace can limit women's access to education and opportunities in the technology industry. Human beings by nature always feel a part of something, and feeling support from either their family or their environment is paramount. Women can face obstacles in obtaining the education and training necessary to enter the technology field, so I have dedicated much of my life to sharing my knowledge and experience to plant the seed of curiosity for all those women who wish to enter the world of technology, my motto is "It's never too late to reinvent yourself".
Wage inequality: In the technology industry, women often receive lower wages than men for the same work. This can be discouraging for women looking to enter the field. Unequal pay can also lead to less motivation for women to enter the technology industry and this can contribute to a lack of diversity in the sector, certainly "being a woman" is not indicative of lower pay for performing the same IT activities as a man. It is very important to raise your voice to be part of the change.
Educational barriers: Women may face educational barriers, especially in science, technology, engineering and mathematics (STEM) areas, which are essential to the technology industry.
Even today there are communities in which women cannot develop in the world of technology because they are only seen as mothers, wives and housewives, so I think we still need to generate more awareness about the importance of knowledge in the areas of technology and develop special programs for the inclusion of women in IT.
We used to be very concerned about bridging the gap and achieving literacy, because a person who cannot read and write in his or her language has difficulty participating fully in society at large. Today we need to make the area of technology literate because the lack of basic skills and knowledge about the use and understanding of technology and the different areas of technology is a big obstacle to develop in this society because technology is more and more present in our daily lives. If we add to that the fact that there are still sectors that think that women are predestined to the arts and men to the sciences, this puts even more pressure on women to decide and choose careers in technology.
So how can we celebrate this International Women's Day to make it meaningful and be the initial framework to generate change?
For me, it is becoming aware of these reasons that are still a major impediment to achieving true equality in the area of technologies between men and women and start being the agents of change by investing time to educate and be evangelists of technology literacy.
Do you want to be part of the change? Together we are stronger!
Today I want to celebrate all the women who manage to develop their passion despite the obstacles they find in their way! Never give up! Be the change you want to see in the world!
In this post I want to give you one of the ways that you could customize the APEX Error page for when you don't want to use the classic default error page.
First of all, we see that, although our application is defined to use the Spanish language, - noting the Spanish text in the second sentence- we can see that the internal APEX message is in English, and certainly seeing this error page like this is not very attractive, is it?
To manage APEX internal messages and translate them into our language we will use the feature in the Globalization section called Text Messages.
Ingresamos a Componentes compartidos -> Globalización -> Mensajes de texto
Click on the button Create Text Message
A modal window opens in which we are going to enter:
The name of the APEX error code (apex_error_code), in this case it is: APEX.AUTHORIZATION.ACCESS_DENIED
Language: Spanish
The text of the message: <h1>Acceso Denegado</h1> <p>No tiene permiso para ingresar a esta página. </p> <p>Ponte en contacto con tu administrador de TI para obtener acceso. </p>
We generate the error again and now it is displayed as follows:
Okay, now let's move on to the interesting part, the customization of this page.
The first thing we need to do is to visualize what type of page template the APEX error page is using.
Para ello volvemos a Componentes compartidos -> Interfaz de usuario -> Temas.
Select Universal Theme 42
We check in the default components which page template is assigned for the error page.
As we can see in the image above, the template that uses the error page is the login page.
Next we go back to the shared components and enter the Templates option in the User Interface section.
APEX groups the templates by type, in this case we need to create a page type template and for this we will make a copy of the login template.
We will give it a name, for example: Custom Error Page.
Then we open the template. APEX templates have several sections, in our case as we want to use this page as the error page, where we are going to make the changes will be in section Error Page Template Control.
This template supports the following substitution strings:
#MESSAGE# and #ADDITIONAL_INFO#: places the error message.
#TECHNICAL_INFO#: shows detailed information about internal errors that will only be visible to developers.
#BACK_LINK#: shows a link to the previous page.
#OK# and #RETURN_TO_APPLICATION#returns translated text strings.
Let's replace the HTML code contained in the Error Page Template Control -> Error Page Template section:
Before applying the changes, we need to give CSS styles to this HTML, to do this we go to the section Cascading Style Sheet and place the following CSS rules.
Note: If it happens to you like me that sometimes you don't know how to combine colors to make a gradient, I tell you that I asked for help to the AI 😊, now that it's so fashionable, I'm discovering how to use it.
And this was what he answered me 😉.
Now it is time to assign our template as the default error page.
Para ello volvemos a Componentes compartidos -> Interfaz de usuario -> Temas.
Select Universal Theme 42.
And we assign to the component Error Page be displayed with the template Custom Error Page.
We apply the changes.
We force again to generate the error and we can see the changes.
As we are in development mode, the page is displayed as follows:
In which we see the technical information.
The end user would see the error page in this other form:
When we click on the Accept returns to the previous page.
I shared this because Tomás, a student asked me about this topic and I thought it would be a good idea to write it down and share it with the community.
I hope it is useful and if you find another way to customize this page I invite you to comment below, so we all learn!
To create our first standalone database we need to have an Oracle cloud account, if you don't have one yet, you can see this article where I show you how to create one.
Now that we have our account created, we enter the dashboard of our OCI. Then click on the hamburger in the upper left corner. Then we click on Oracle Database –> Autonomous Transaction Processing.
The screen where all the stand-alone databases are listed appears. To create our first standalone database we click on the button Create Autonomous Database.
Next we need to provide basic information:
Display name: here we enter a user-friendly description or other information that will help us to easily identify the resource. The display name does not have to be unique, and can be changed at any time. Avoid entering sensitive information.
Compartment: here we select the compartment of the stand-alone database. The compartments allow us to give an order to our databases. For example, we can have our databases organized by environments: Development, Test, Production, or we can organize it in any other criteria defined by the organization.
Database name: The database name must consist of letters and numbers only, starting with a letter. The maximum length is 14 characters. Avoid entering sensitive information here as well.
Below we need to select the workload type, deployment type and other settings.
The stand-alone database offers two types of workload:
"Oracle Autonomous - Transaction Processing". provides us with a self-contained, secure, self-healing database service that can instantly scale to meet the demands of mission-critical transaction processing and mixed workload applications.
"Oracle Autonomous - Data Warehouse". provides us with a fully self-contained, easy-to-use database that scales elastically, offers fast query performance and requires no database administration.
Next, we need to select the type of deployment:
No Serveris a simple and elastic deployment option. Oracle autonomously operates all aspects of the database lifecycle, from database placement to backup and upgrades.
Dedicatedis a private cloud on public cloud deployment option. A fully dedicated compute, storage, network and database service for a single tenant. The dedicated deployment provides the highest levels of security isolation and governance. The customer has customizable operational policies to guide autonomic operations for workload placement, workload optimization, upgrade scheduling, availability level, over-provisioning and peak utilization.
If we activate the option Always free of chargeThe main CPU count and Storage are disabled to show the free options (1 core and 0.02 TB).
Checking the "Auto Scaling" checkbox allows the system to use up to three times as many cores as provisioned as the workload increases.
On the other hand, if we deactivate the "Always Free" option, we can allocate the resources according to our requirements, with an associated cost at the end of the trial period.
In the next screen, we must enter the password of the ADMIN user and select the type of network and the type of license we require.
In case we have a database license we choose "Bring Your Own License (BYOL)" otherwise we choose License Included. For this demo we choose License Included.
In the case of the license we choose by default Acceso seguro desde cualquier lugar.
At the bottom of this same screen we can see a section to enter emails for contacts with which they will receive notifications and announcements.
In addition we can also see the link "Show/Hide Advanced Options".
By clicking on the link we can define tags to organize the resources in our lease and track them.
Click on the button Create Autonomous Database.
Immediately after that we are shown the page with the details of the standalone database, in provisioning status.
After a few minutes the stand-alone database is available.
Logging into Oracle APEX from the Standalone Database
Select the newly created standalone database. Then select the Tools tab.
A new window opens and asks us to enter the password of the ADMIN user.
Once the password for the standalone database has been entered, the Create APEX Workspace page is displayed.
Then the screen appears to configure whether we want a new schematic or an existing schematic. For this demonstration we choose new schematic.
Ingresamos el workspace, username y password.
Click on the button Create Workspace.
Next, the Instance administration page is displayed.
We exit the instance administration and enter the new Workspace we have just created.
The Login page is displayed in Oracle APEX. Click on the Connect button.
And this way we enter the APEX home page ready to create new applications in Oracle APEX 22.2.1.
Let's take advantage of these free resources provided by Oracle to learn APEX with an Autonomous database!
In this article we are going to see how to create an account in Oracle Cloud, you will see how simple it is and for this we need to enter the following URL:
Click on the button Verify my email; an email is sent to our inbox with which we verify our email address. Then we enter the password, account type and region.
Click on the button Continue.
We enter the address and telephone number.
Click on the button Continue.
Now we are asked to verify a payment method.
We enter our credit card information. It will not generate any charge, it is only necessary for when we want to make an account update.
Once the payment method has been verified, a thank you window will appear.
We accept the agreement by clicking on the checkbox and then click on the button Start my free trial.
We wait for our account to be created, just a little bit of patience is all that is needed 🙂
Once the account is created, we are taken to the page to enter our account name:
Then we enter our User Name or E-mail and the password that we had configured when we created the account.
We are now on our OCI dashboard, ready to start working on the creation of the standalone database!
Crear un token de autenticación de almacenamiento de objeto
Para cargar datos de un almacén de objetos de Oracle Cloud Infrastructure Object Storage, debemos crear un token de autenticación para nuestra cuenta de almacén de objetos. La comunicación entre nuestra base de datos de procesamiento de transacciones autónomo y el almacén de objetos se basa en el Auth Token y la autenticación de nombre de usuario/contraseña.
1. Ingresamos a nuestra cuenta y pasamos el cursor sobre el ícono de la figura humana en la parte superior derecha de la consola y hacemos clic en Configuración de usuario en el menú desplegable.
2. En la pantalla de configuración hacemos clic en Tokens de autenticación en la parte inferior de la pantalla, debajo de Recursos y luego hacemos clic en el botón Generar token.
3. En el cuadro de diálogo ingresamos una descripción, luego hacemos clic en el botón Generar token.
Crear credenciales de almacenamiento de objetos en nuestro esquema de procesamiento de transacciones autónomo
Ahora que hemos creado un almacén de objetos Auth Token, almacenaremos en nuestro esquema de procesamiento de transacciones autónomo atpc_user las credenciales del almacén de objetos en el que se almacenan nuestros datos.
1. Abrimos el SQL Developer y nos conectamos con nuestra base de datos de procesamiento de transacciones autónomo como usuario atpc_user. (Al inicio del artículo tienes los enlaces a las distintas partes de esta serie de tutoriales donde muestro como conectarte con el usuario atpc_user).
2. En una hoja de trabajo de SQL Developer, usamos el procedimiento create_credential del paquete DBMS_CLOUD para almacenar las credenciales del almacén de objetos en nuestro esquema atpc_user.
Creamos un nombre de credencial. Hacemos referencia a este nombre de credencial en el procedimiento copy_data en el siguiente paso.
Especificamos las credenciales para nuestro servicio Oracle Cloud Infrastructure Object Storage: el nombre de usuario y el token de autenticación del almacén de objetos que generamos en el paso anterior.
Después de ejecutar esta secuencia de comandos, las credenciales de nuestro almacén de objetos se almacenan en nuestro esquema atpc_user de la base de datos ATP.
Copiar datos del almacén de objetos a tablas de bases de datos ATP
El procedimiento copy_data del paquete DBMS_CLOUD requiere que las tablas de destino ya existan en nuestra base de datos de procesamiento de transacciones autónomo. Ver el tutorial 2 donde creamos las tablas dentro del esquema atpc_user.
Ahora vamos a ejecutar el procedimiento copy_data para copiar los datos almacenados en nuestro almacén de objetos a nuestras tablas atpc_user de nuestra base de datos de procesamiento de transacciones autónomo.
1. En una hoja de trabajo de SQL Developer, utilizamos el procedimiento copy_data del paquete DBMS_CLOUD para copiar los datos almacenados en nuestro almacén de objetos.
Para credential_name, especificamos el nombre de la credencial que definimos anteriormente, “Crear credenciales de almacenamiento de objetos en nuestro esquema de procesamiento de transacciones autónomo”.
Para file_uri_list, especificamos la URL que apunta a la ubicación del archivo almacenado en nuestro almacén de objetos. La URL está estructurada de la siguiente manera. Los valores que especificamos están en negrita: https://swiftobjectstorage.<region name>.oraclecloud.com/v1/<tenant name>/<bucket name>/<file name>
Hacer clic aquí para ver un script de ejemplo. En el script, debemos usar nuestros propios nombres de tabla, nombre de región, nombre de tenant, nombre de depósito/cubo y nombres de archivo. Note: El nombre de la región, el nombre del tenant y el nombre del depósito se pueden encontrar en un solo lugar haciendo clic en el menú de opciones de puntos suspensivos y yendo a los detalles del archivo.
Ejemplo de código para llamar al procedimiento copy_data desde el SQL Developer.
Si obtenemos error de privilegios del usuario atpc_user, le otorgamos los privilegios conectándonos con el usuario ADMIN a nuestra base de datos ATP.
Ejecutamos el procedimiento para cada uno de los archivos:
2. Después de ejecutar el procedimiento, observamos que los datos se han copiado del almacén de objetos a las tablas en nuestra base de datos de procesamiento de transacciones autónomo.
Confirmar la Carga de Datos
Todas las operaciones de carga de datos realizadas con el paquete PL/SQL DBMS_CLOUD se registran en las tablas dba_load_operations and user_load_operations. Estas tablas contienen lo siguiente:
dba_load_operations: muestra todas las operaciones de carga.
user_load_operations: muestra las operaciones de carga en nuestro esquema.
Consultamos estas tablas para ver información sobre cargas de datos en curso y completadas. Por ejemplo:
SELECT table_name, owner_name, type, status, start_time, update_time, logfile_table, badfile_table
FROM user_load_operations WHERE type = 'COPY';
2. Examinamos los resultados. El registro y los archivos defectuosos son accesibles como tablas.
De esta forma hemos llegado al final de este tutorial en el cual aprendimos como cargar los datos de las tablas SH del ejemplo del esquema de Oracle en nuestra base de datos de transacciones autónoma conectándonos desde nuestro SQL Developer local.
Podemos cargar datos en el procesamiento de transacciones autónomo utilizando herramientas de base de datos de Oracle y herramientas de integración de datos de Oracle y de terceros. Podemos cargar datos:
Desde archivos locales a nuestra computadora cliente, o
De archivos almacenados en un almacén de objetos basado en la nube
Para una experiencia de carga de datos más rápida, Oracle recomienda cargar los archivos de origen en un almacén de objetos basado en la nube, como Oracle Cloud Infrastructure Object Storage, antes de cargar los datos en nuestra base de datos de procesamiento de transacciones autónomo.
Para cargar datos de archivos en la nube a nuestra base de datos de procesamiento de transacciones autónomo, usamos el nuevo paquete PL/SQL DBMS_CLOUD. El paquete DBMS_CLOUD admite la carga de archivos de datos de las siguientes fuentes en la nube: Oracle Cloud Infrastructure Object Storage, Oracle Cloud Infrastructure Object Storage Classic y Amazon AWS S3.
En este tutorial vamos a aprender cómo cargar datos desde Oracle Cloud Infrastructure Object Storage mediante dos de los procedimientos del paquete DBMS_CLOUD:
Create_credential: almacena las credenciales del almacén de objetos en nuestro esquema de procesamiento de transacciones autónomo.
Utilizaremos este procedimiento para crear credenciales de almacén de objetos en nuestro esquema atpc_user de Autonomous Transaction Processing que definimos en un tutorial anterior.
Copy_data: cargamos el archivo fuente especificado en una tabla. La tabla ya debe existir en nuestra base de datos de procesamiento de transacciones autónomo.
Utilizaremos este procedimiento para cargar tablas en el esquema atpc_user con datos de archivos de datos almacenados en el servicio en la nube Oracle Cloud Infrastructure Object Storage.
En este tutorial mostramos cómo cargar datos en tablas SH (tablas de historial de ventas de un esquema de muestra de Oracle: SALES, COSTS, TIMES, PRODUCTS, CHANNELS, PROMOTIONS, CUSTOMERS, COUNTRIES, SUPPLEMENTARY_DEMOGRAPHICS).
Cargar archivos de datos en nuestro almacén de objetos
Cargamos los archivos en el Almacenamiento de objetos de nuestra base de datos de transacciones autónomo. Para este tutorial utilizamos un almacén de objetos en el servicio Oracle Cloud Infrastructure —> Object Storage.
Iniciamos sesión en nuestra consola de infraestructura de Oracle Cloud con las siguientes credenciales proporcionadas por nuestro administrador de Oracle Cloud: cloud tenant, nombre de usuario, contraseña.
Seleccionamos Almacenamiento de objetos en el menú de hamburguesa en la parte superior izquierda de la consola de Oracle Cloud Infrastructure. Luego seleccionamos Almacenamiento de objetos en el submenú.
Seleccionamos el compartimiento que creamos en el tutorial anterior para crear el depósito (cubo) para cargar los datos de la tabla de nuestra base de datos. En este momento nuestro compartimento está vacío.
Hacemos clic en Crear cubo para crear el cubo de almacenamiento en el cual vamos a cargar nuestros archivos de origen. Posteriormente copiaremos estos datos por etapas en tablas en nuestra base de datos de procesamiento de transacciones autónomo.
Ingresamos el nombre del cubo, seleccionamos el nivel de almacenamiento standard y hacemos clic en el botón Crear Cubo.
Hacemos clic en el cubo recién creado desde la pagina del dasboard de Cubos en el compartimento.
Hacemos clic en el botón Cargar para seleccionar los archivos que vamos a subir en el cubo.
Navegamos hasta la ubicación de los archivos de datos en nuestra computadora local. Arrastramos y soltamos cada archivo individualmente o hacemos clic en Seleccionar archivos para cargar todos los archivos.
Para este tutorial cargamos los archivos de datos de las tablas SH. Hacemos clic aquí para descargar un archivo zip de 10 archivos de datos SH para que los carguemos en el almacenamiento de objetos. Descomprimimos los archivos de datos del archivo zip, porque los archivos zip no se pueden cargar. Subimos cada archivo de datos descomprimido individualmente.
Nota: Alternativamente, podemos usar los comandos curl para cargar una gran cantidad de archivos.
Una vez que tenemos los Los 10 archivos de datos subidos hacemos clic en el botón Cargar.
Estos archivos almacenados en la nube están listos para copiarse en las tablas de nuestra base de datos de procesamiento de transacciones autónomo.
En la siguiente entrega continuaremos con la parte dos de este tutorial.